Simple Flying Rig
As you want to view the visualizations you create, you will want to be able to change perspective and move through your scenes in game.
The tool that you use to do this is referred to as a camera rig. Basically, the name says what it is–you rig the camera up to a player object, and when the player moves the camera moves.
Unity comes with a number of built in camera rigs that are great for video games, but may not be what you want for modeling and visualization. For many visualization issues, what you really want is a simple flying rig, no gravity, no collisions, and complete control of direction and roll so that you can view your scene from any position and any perspective.
This will vary somewhat depending on your platform. A “flying” rig might make perfect sense on a PC, but lead to motion sickness in VR. WASD/mouse and gamepad commands may feel natural on a computer, but not in a mobile environment. Your camera rig is one element you will likely want to customize and have multiple versions of if you are looking to develop for multiple platforms.
This post, for simplicity, will focus on a standard PC/Mac environment, though we will add in gamepad through the Unity input manager with little additional effort.
We’ll return to camera rigs best for VR and mobile later.
Building a camera rig will depend on a few different features of Unity. First, we need to be able to attach many game objects in the scene to a single parent. In this case, we will attach a camera to a empty game object, and we can add an optional avatar that could be viewed in multiplayer, or to ease scene building. Second, we will rely on the CharacterController component to simplify some of our motions. Third, we will make use of the Input class, using it to access keyboard, mouse, and controller events.
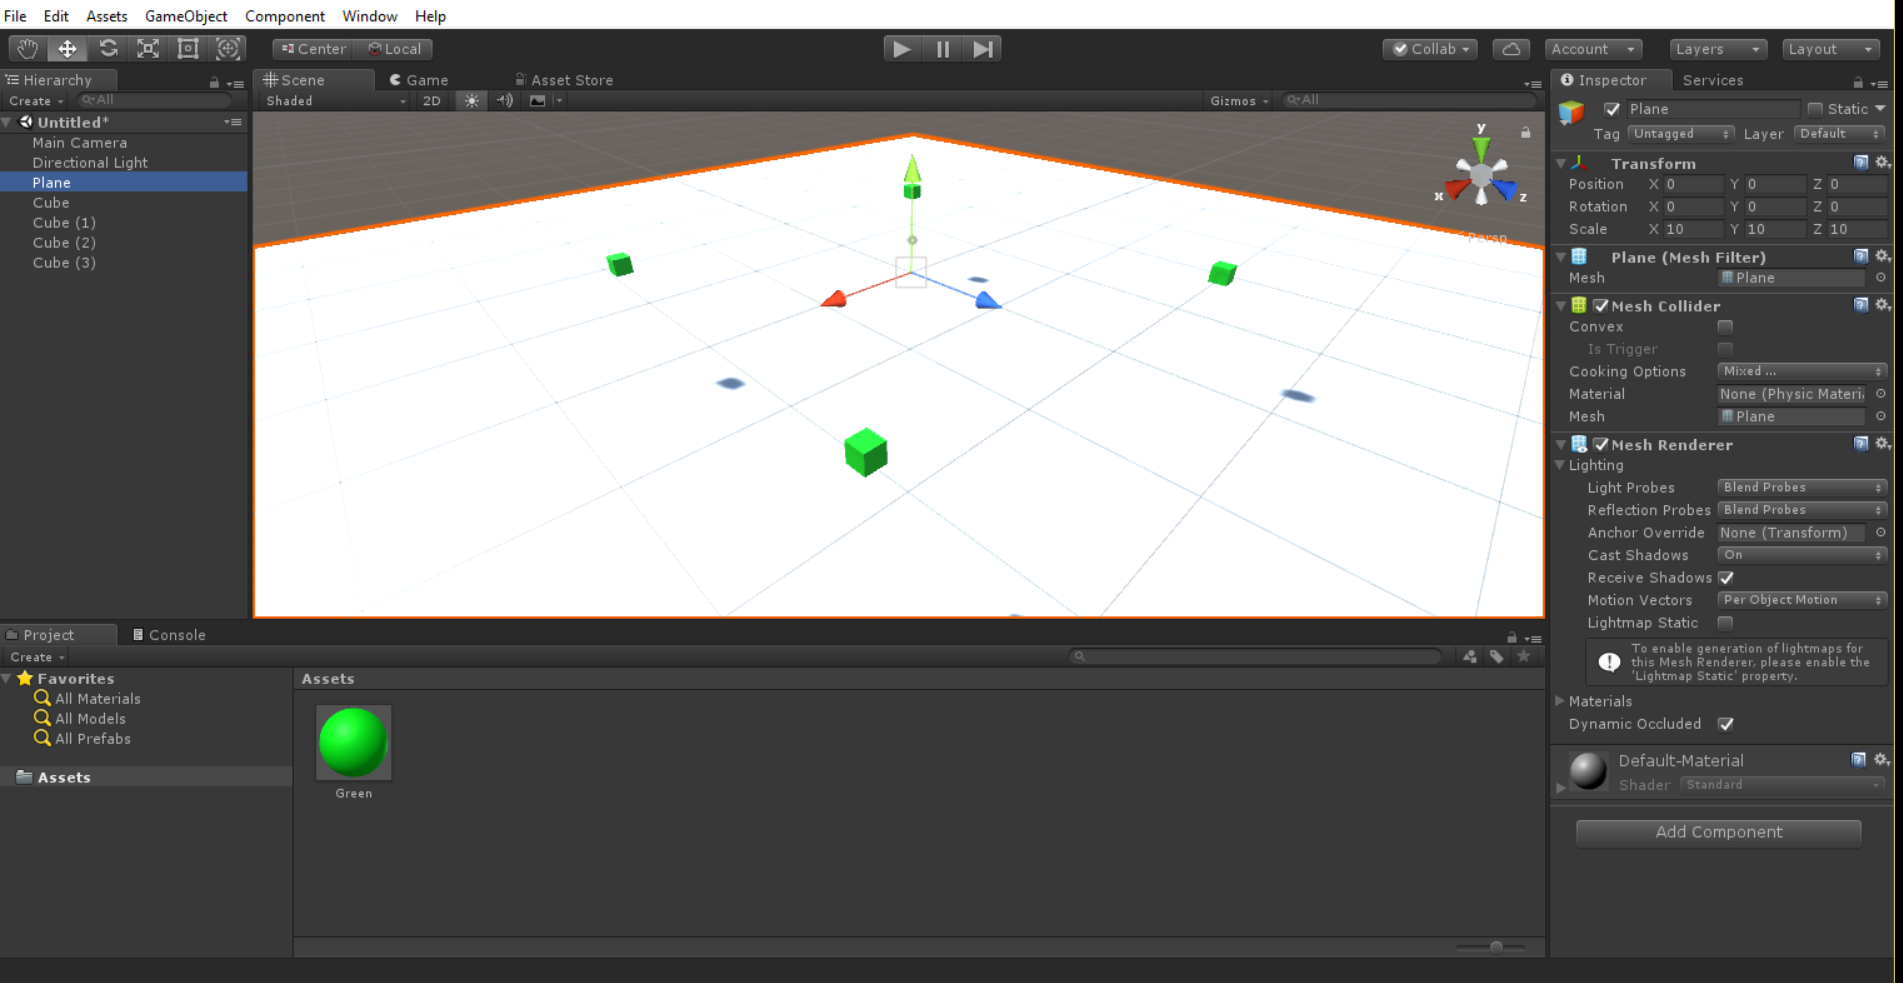
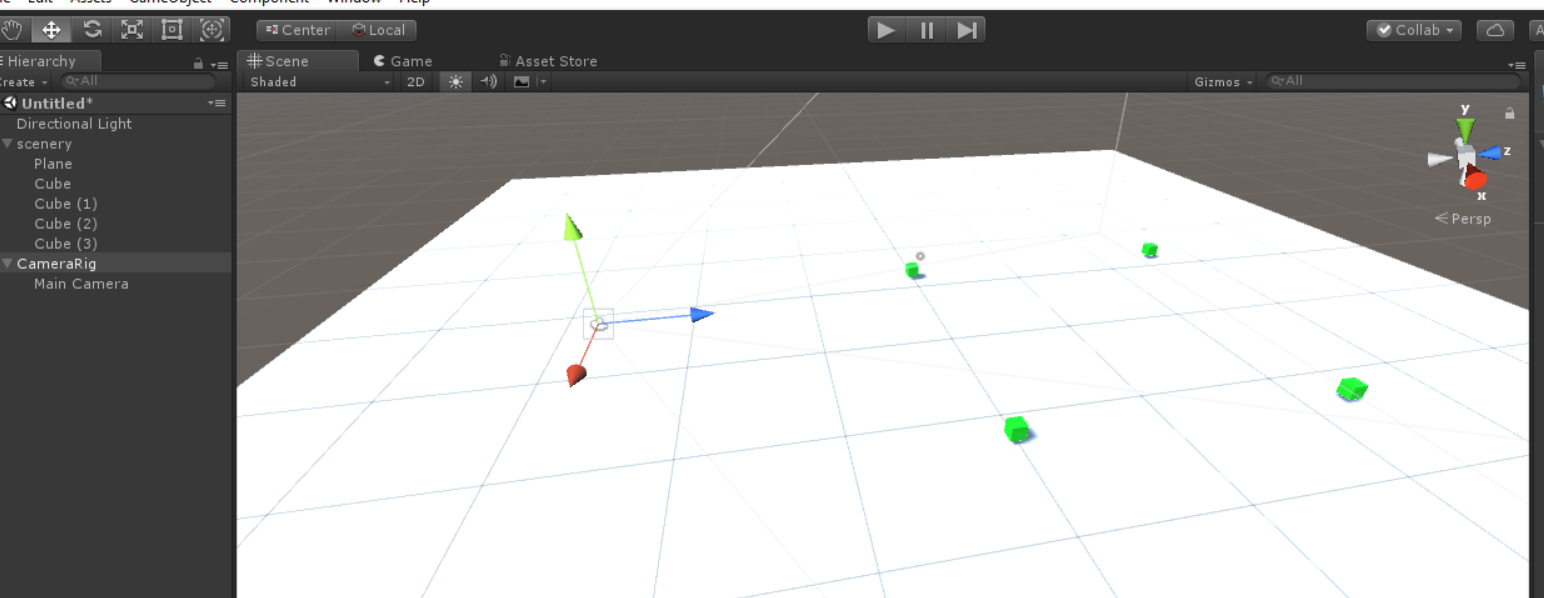
Open Unity and create a new 3D game. Add in some basic scene elements so that we will have something to look at. I would recommend a plane and some cubes, but its your scene, make it what you want. My scene will be a plane centered at 0,0,0 with a scale of 10,10,10, and 4 cubes. The default material is a little brighter than I want, so I’ll add a material, and set its color to something a little darker, and apply it to my cubes to have them stand out from the plane and from the sky.
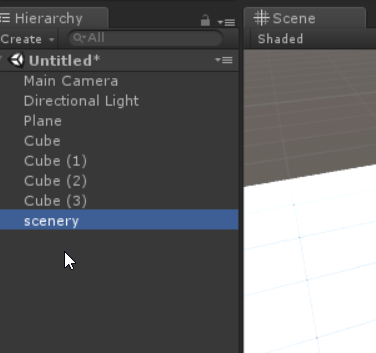
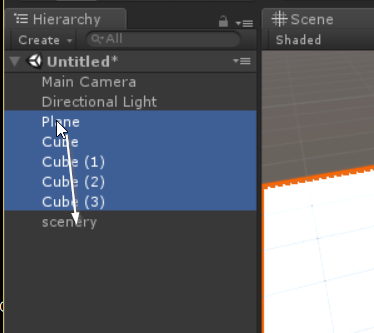
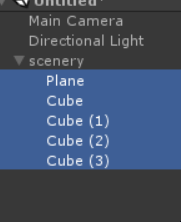
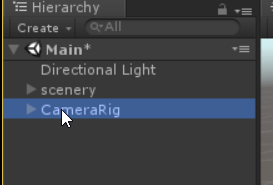
Let’s learn how to group together objects in the scene under a single parent object. Create an empty game object in your hierarchy, and name it “scenery.” Highlight and drag your objects in the scene to the new empty object. If this works, all of the objects can be grouped together under a single parent. Try highlighting the parent and moving and/or scaling it either in the scene view or in the Inspector window. Notice that all of the children move, rotate, and scale with the parent element. You can reset the scene in the inspector by setting the parent object transform back to 0,0,0/0,0,0/1,1,1.
You can also use the triangle next to your parent object name in the hierarchy to minimize the object, and thus hide the details of a large object in the hierarchy view.
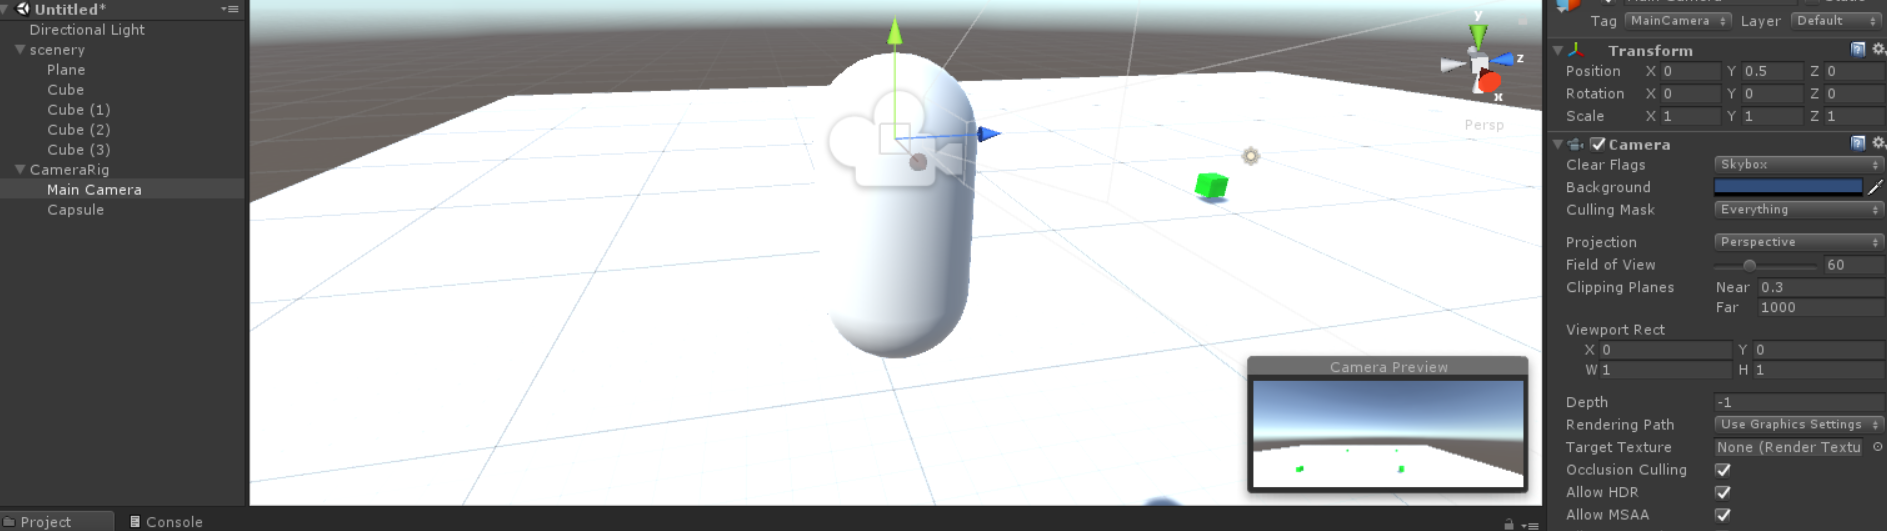
Let’s make our camera rig. Create a new empty game object, and name it CameraRig. Drag the Main Camera into the CameraRig object. double check that the transform of both are set to 0,0,0/0,0,0/1,1,1. Move the camera rig in the scene such that you have an interesting starting view.
Let’s add one more thing to our camera rig. Let’s add a capsule so that it is easier to see the rig in the scene. Add a capsule to the scene and make it a child of the CameraRig. Check that the relative transform of the capsule is 0,0,0/0,0,0/1,1,1. Notice that the camera is at the midpoint of the capsule. Let’s move the camera up slightly. Set the y position of the camera to 0.5, this will have the effect of making the camera the “eyes” of the capsule. (We could really use just about anything for our avatar, but capsules are typical for first person avatars, and sticking with that may make our rig easier to modify for other purposes later.)
If you haven’t done so, save your scene. Keep doing so.
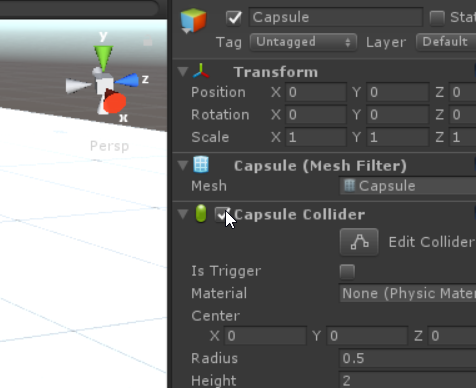
A little more housekeeping on our avatar–the default capsule comes with a collider attached, which is great for games (so you don’t fall through the floor or walk through walls), but for modeling and visualization you likely want to be able to go everywhere and look through anything. Let’s disable (but not remove) the capsule collider. Disabling a component is a good way to test how something would behave without a component in a way that is easy to undo.
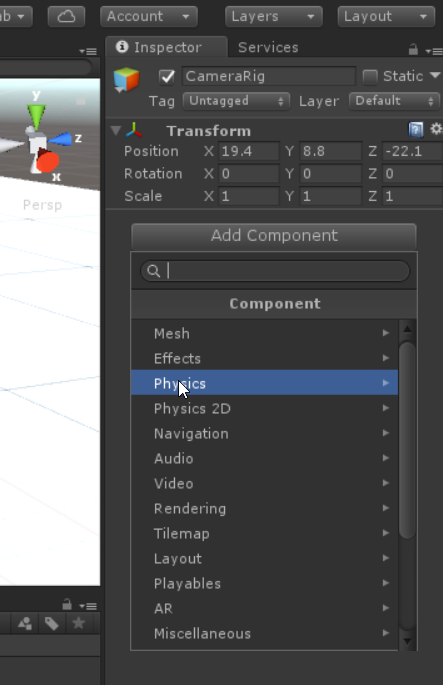
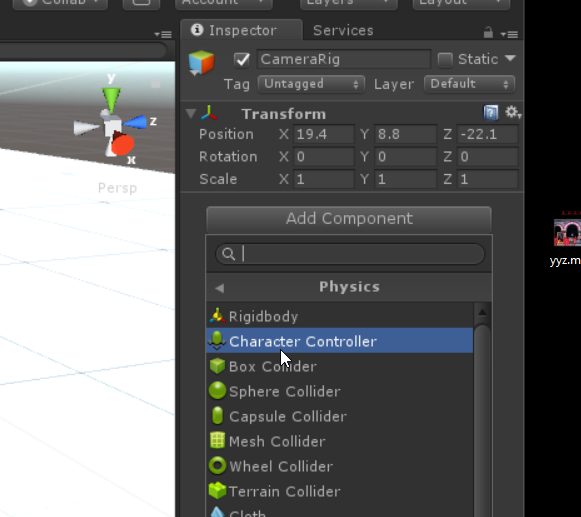
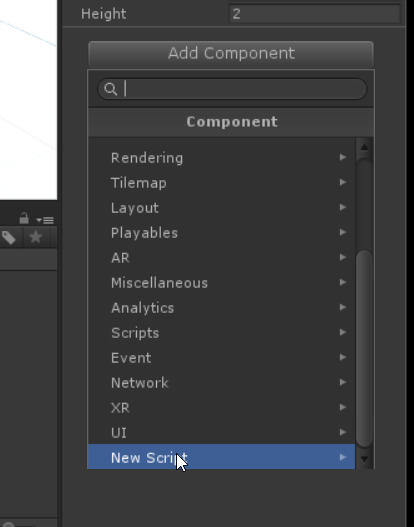
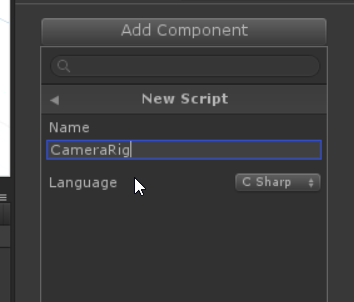
To the CameraRig object, let’s add a CharacterController and an empty CameraRig script.
Go ahead and drag the camera rig from the Hierarchy to the Project panel to make a prefab. This will make it easier to add to other scenes or export to other projects.
Open up the CameraRig script. Let’s create a member variable to hold a reference to the CharacterController, and set it up in Start. Remember the use of GetComponent, which is a templated method to get different components attached to a given GameObject.
using System.Collections;
using System.Collections.Generic;
using UnityEngine;

public class CameraRig : MonoBehaviour {

	CharacterController cc = null;

	// Use this for initialization
	void Start () {
		cc = GetComponent<CharacterController> ();
	}

	// Update is called once per frame
	void Update () {

	}
}
In Update, lets make a simple modification and test it. The Input system typically allows you to access “Axes,” “Buttons,” and “Keys.” Any sort of input can be mapped to a button or an axis, the difference is that buttons have events when they are pressed down, when they are held, and when they are released, and axes have events that return a value that can be positive or negative and potentially could be real valued (e.g. -0.2 or +0.5 instead of just 1 or 0.) Keys are keys–its keyboard codes. I typically avoid them as its easier to keep things multi-platform and multi-controller to work through buttons and axes mapped in the Input system. I’ll also add a single float that can be used to adjust movement speed.
using System.Collections;
using System.Collections.Generic;
using UnityEngine;

public class CameraRig : MonoBehaviour {

	CharacterController cc = null;
	float speed = 1.0f;

	// Use this for initialization
	void Start () {
		cc = GetComponent<CharacterController> ();
	}

	// Update is called once per frame
	void Update () {
		float forward = Input.GetAxis ("Vertical");

		cc.Move (speed * forward * transform.forward * Time.deltaTime);
	}
}
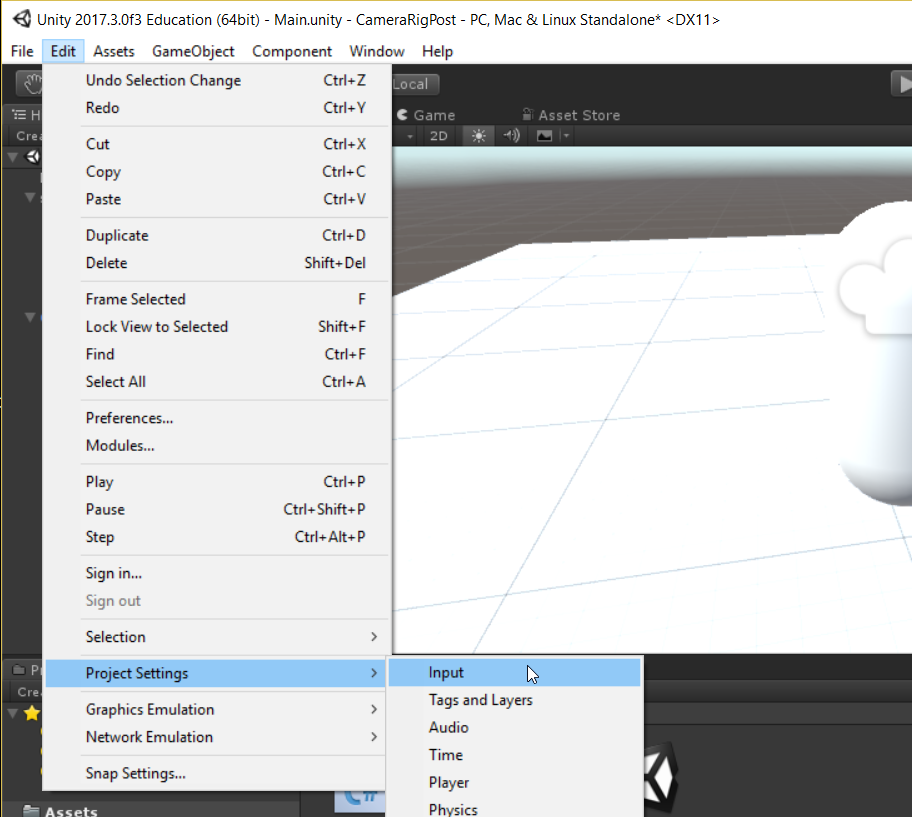
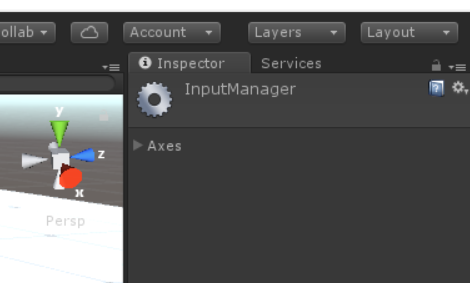
Note the use of GetAxis here, which gets input from the “Vertical” axis, and stores it in a float called forward. In the Unity editor, go to the Input panel in Project Settings. Notice this opens up in the inspector, and is initially minimized. Maximize the Axes to see each axis of input.
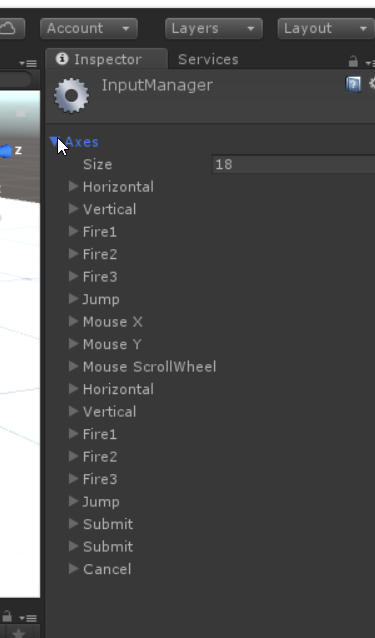
There are two different entries for the Vertical axes. Expand the first. We see that the up and down arrows are mapped to forward. Additionally, there is an alternate mapping of s and w (e.g. WASD controls). There is a gravity feature, which controls how quickly the axis relaxes to zero after it is no longer activated, a “dead” zone where axis values less than a given value are ignored (this is useful for joysticks which may not have a perfect zero calibration), and a sensitivity, which allows you to individually adjust how each control affects the result of a GetAxis call.
Open up the second entry for Vertical. Notice this maps to the Joystick Y axis. It has no gravity, as the joystick will automatically return to center, but has a much larger dead zone and a lower sensitivity. If you have a controller (must typical 2 joystick gamepads will work here, the XBox One controller has specific Unity mappings you can find online) Click here for an XBox One - Unity button map you can plug it in and test with it.
Press play and test the up and down arrows, the w and s keys, and if you have it plugged in a controller, and notice the ability to move forwards and backwards. Increase the speed variable as needed to your comfort.
The “cc.Move” command takes a Vector3 input of a displacement in the scene. transform.forward is the forward direction that our controller is facing, and has a magnitude of 1. We scale it by our absolute speed, the value of Input.GetAxis(“Vertical”), and Time.deltaTime. Time.deltaTime is the time elapsed since the last frame. If we don’t scale our movements by this, our motion will get jumpy when framerate lags or spikes.
Let’s add in a similar check on the “Horizontal” axis.
using System.Collections;
using System.Collections.Generic;
using UnityEngine;

public class CameraRig : MonoBehaviour {

	CharacterController cc = null;
	float speed = 20.0f;

	// Use this for initialization
	void Start () {
		cc = GetComponent<CharacterController> ();
	}

	// Update is called once per frame
	void Update () {
		float forward = Input.GetAxis ("Vertical");
		float strafe = Input.GetAxis ("Horizontal");

		cc.Move (
			speed * Time.deltaTime * (
				forward * transform.forward
				+
				strafe * transform.right
			)
		);
	}
}
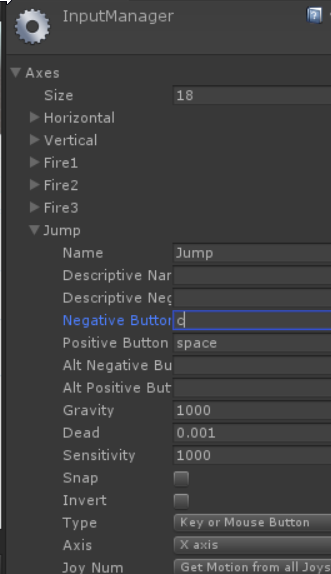
We also need an up/down. There is a “Jump” axis in input, but it typically doesn’t have a default negative value (you jump up and gravity brings you down.) We want to modify this. Open the Input settings, and open the Jump axis (the first entry). Currently we “jump” on space. Let’s add in a “crouch” on c. This is a little tricky messing with the Input settings, as we will need to make the same changes in other projects that use this camera rig. You can make a similar mapping for the controller settings, I typically map to either “joystick button 2” (this will conflict with “Fire3” but will be more intuitive on a standard controller) or “joystick button 4” (less intuitive but doesn’t conflict with default Input settings.)
Maybe save your scene and project right about now… You know, if you haven’t done it recently.
Let’s add in the jump/crouch axis.
using System.Collections;
using System.Collections.Generic;
using UnityEngine;

public class CameraRig : MonoBehaviour {

	CharacterController cc = null;
	float speed = 20.0f;

	// Use this for initialization
	void Start () {
		cc = GetComponent<CharacterController> ();
	}

	// Update is called once per frame
	void Update () {
		float forward = Input.GetAxis ("Vertical");
		float strafe = Input.GetAxis ("Horizontal");
		float jump = Input.GetAxis ("Jump");

		cc.Move (
			speed * Time.deltaTime * (
				forward * transform.forward
				+
				strafe * transform.right
				+
				jump * transform.up
			)
		);
	}
}
Playing this, then flying up and down, notice that merely turning off the capsule collider on our avatar doesn’t stop collisions. As it turns out, the CharacterController component has a built in collider that doesn’t show up in the inspector. If we want to configure our flying camera rig to go through floors and walls and objects, we need to disable collision a little differently.
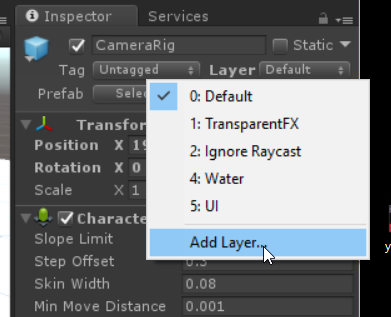
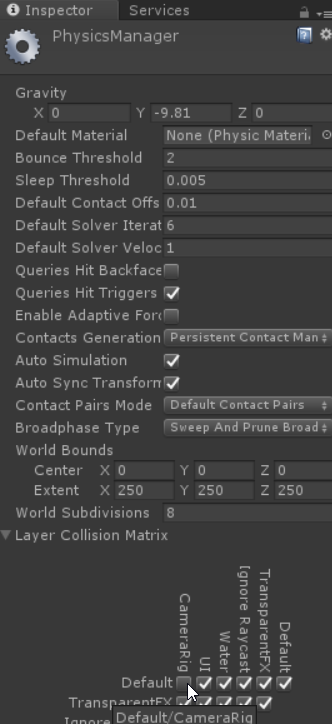
Unity groups scene objects in different layers for the purposes of applying different effects and physics. We are going to create a custom layer for our camera rig, so that we can disable interaction between the default layer and our camera rig layer.
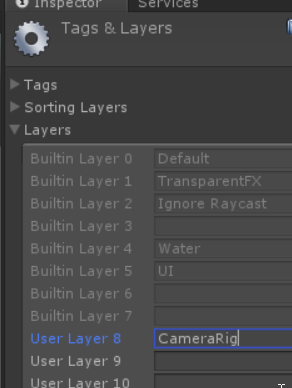
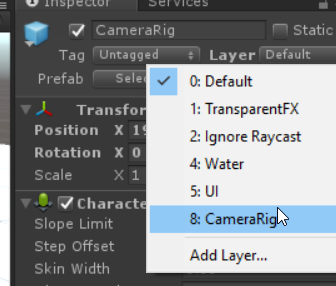
Select your camera rig object in the hierarchy, and go to the pull down menu for layer in the Inspector. Select add layer. Add a new user layer called CameraRig. Go back to viewing the camera rig in the inspector. Use the pulldown menu to set the layer to camera rig.
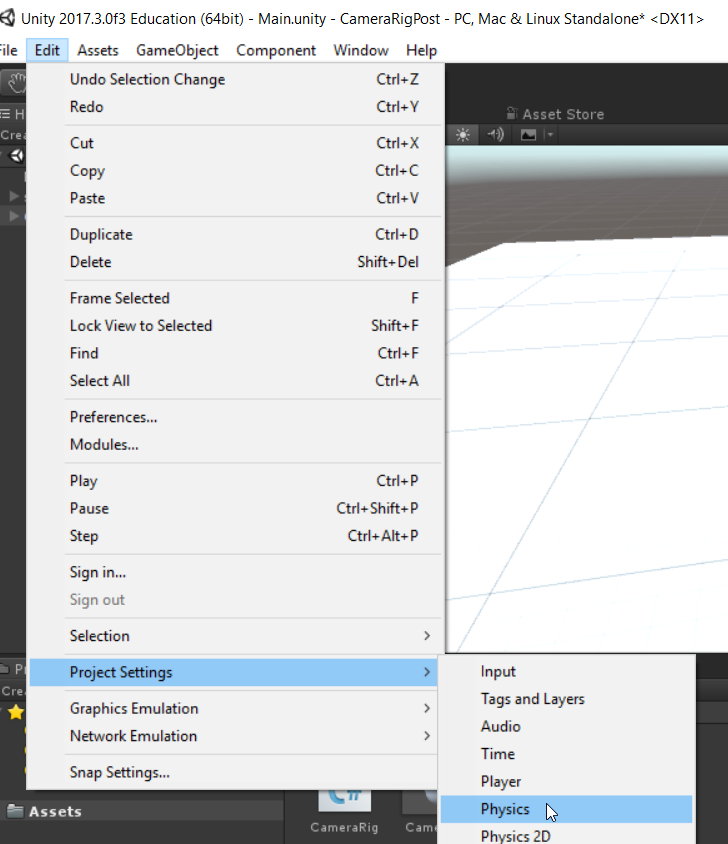
Now we need to edit the Physics project settings. In the layer collision matrix uncheck the interaction between the CameraRig layer and the default layer.
Play the scene and now you can move through the floor. (As an aside, if you’ve never noticed the default for Unity meshes is that they are one-sided… this can be changed with some shader magic, but when you use standard objects you only see them from the outside in, and from the front side not the back.)
Finally, lets add mouse movement into the mix so that we can look around in the scene. Open the CameraRig script. Add in calls to access Input.GetAxis(“Mouse X”) and “Mouse Y”, and use those with the Rotate command to rotate your transform.
using System.Collections;
using System.Collections.Generic;
using UnityEngine;

public class CameraRig : MonoBehaviour {

	CharacterController cc = null;
	float speed = 20.0f;
	float lookspeed =80.0f;

	// Use this for initialization
	void Start () {
		cc = GetComponent<CharacterController> ();
	}

	// Update is called once per frame
	void Update () {
		float forward = Input.GetAxis ("Vertical");
		float strafe = Input.GetAxis ("Horizontal");
		float jump = Input.GetAxis ("Jump");
		float lookside = Input.GetAxis ("Mouse X");
		float lookup = -Input.GetAxis ("Mouse Y");

		cc.Move (
			speed * Time.deltaTime * (
				forward * transform.forward
				+
				strafe * transform.right
				+
				jump * transform.up
			)
		);

		if (Input.GetMouseButton (1)) {
			Vector3 rotAxis = (lookside * transform.up + lookup * transform.right);
			float rotValue = rotAxis.magnitude;
			transform.Rotate (rotAxis.normalized, rotValue * lookspeed * Time.deltaTime, Space.World);
		}
	}
}
Notice that we’ve added another speed variable to make it easy for you to set the sensitivity to your preference. The variables lookside and lookup are used to get the mouse motion, and the y motion is inverted here. If you don’t like this, don’t use the minus sign. We put the actual rotate command in an if block, so that you only look around if the right mouse button (button 0 is the left, and button 2 is the middle) is pressed. You can change this, of course, but particularly when working in the editor you may find that having mouse motion always on is distracting. The rotate command has a few different versions, but here we are rotating about a given axis, by a given angle. For the axis, we are combining up and right, with values equal to the mouse X and mouse Y changes. We’re combining those two changes in quadrature (value of the total change around the combined axis) to get the angular change. We are scaling the actual change by our lookspeed and the framerate.
Implement these changes and play your code. You should now be able to fly through your scene with WASD or arrow keys, and change your viewpoint with the mouse.
You may find that occasionally you get off your center axis. There are a few fixes, each of which introduces something yo may not want. First, you could change your rotation so that you use Space.Self instead of Space.World. This rotation behaves contrary to expected behavior when you move the mouse while looking up or down. You could rigidly lock your orientation to always be directly forward, which prevents you from looking up or down. You could add in a roll feature, which will give you more natural movement, but will involve changing the Input settings in a way that you will have to implement for every other project in which you import your camera rig.
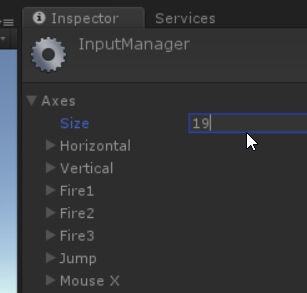
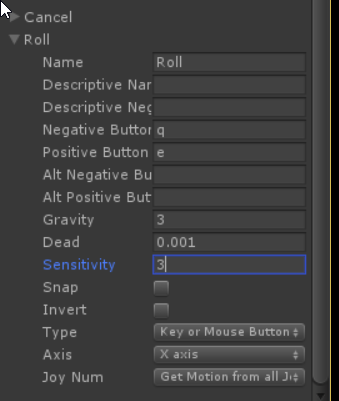
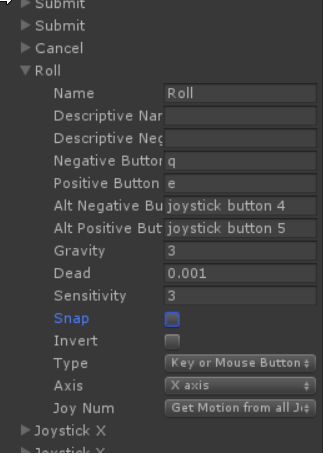
If you don’t like the behavior you get from using Space.Self instead of Space.World, and want to try adding a roll feature, you can do the following. In the Input Settings, create a new space by making the number of items in the Axes one bigger. Using the last space added, change the name to “Roll.” Add in the q and e keys as positive and negative values, and clear out any old information in the other fields.
In the CameraRig script, check the roll axis and use it to rotate about transform.forward.
using System.Collections;
using System.Collections.Generic;
using UnityEngine;

public class CameraRig : MonoBehaviour {

	CharacterController cc = null;
	float speed = 20.0f;
	float lookspeed =80.0f;
	float rollspeed =40.0f;

	// Use this for initialization
	void Start () {
		cc = GetComponent<CharacterController> ();
	}

	// Update is called once per frame
	void Update () {
		float forward = Input.GetAxis ("Vertical");
		float strafe = Input.GetAxis ("Horizontal");
		float jump = Input.GetAxis ("Jump");
		float lookside = Input.GetAxis ("Mouse X");
		float lookup = -Input.GetAxis ("Mouse Y");
		float roll = Input.GetAxis ("Roll");

		cc.Move (
			speed * Time.deltaTime * (
				forward * transform.forward
				+
				strafe * transform.right
				+
				jump * transform.up
			)
		);

		if (Input.GetMouseButton (1)) {
			Vector3 rotAxis = (lookside * transform.up + lookup * transform.right);
			float rotValue = rotAxis.magnitude;
			transform.Rotate (rotAxis.normalized, rotValue * lookspeed * Time.deltaTime, Space.World);
		}

		transform.Rotate (transform.forward, rollspeed * roll * Time.deltaTime, Space.World);
	}
}
Since this introduces a change that could potentially cause errors when introducing this script in a new project, you might want to use a preprocessor directive to make it easy to #if #endif this behavior out of your script easily. #define statements in C# must come at the beginning of your script before the using statements.
#define ROLL_ENABLED
using System.Collections;
using System.Collections.Generic;
using UnityEngine;

public class CameraRig : MonoBehaviour {

	CharacterController cc = null;
	float speed = 20.0f;
	float lookspeed =80.0f;
	float rollspeed =40.0f;

	// Use this for initialization
	void Start () {
		cc = GetComponent<CharacterController> ();
	}

	// Update is called once per frame
	void Update () {
		float forward = Input.GetAxis ("Vertical");
		float strafe = Input.GetAxis ("Horizontal");
		float jump = Input.GetAxis ("Jump");
		float lookside = Input.GetAxis ("Mouse X");
		float lookup = -Input.GetAxis ("Mouse Y");
		float roll = Input.GetAxis ("Roll");

		cc.Move (
			speed * Time.deltaTime * (
				forward * transform.forward
				+
				strafe * transform.right
				+
				jump * transform.up
			)
		);

		if (Input.GetMouseButton (1)) {
			Vector3 rotAxis = (lookside * transform.up + lookup * transform.right);
			float rotValue = rotAxis.magnitude;
			transform.Rotate (rotAxis.normalized, rotValue * lookspeed * Time.deltaTime, Space.World);
		}
		#if ROLL_ENABLED
		transform.Rotate (transform.forward, rollspeed * roll * Time.deltaTime, Space.World);
		#endif
	}
}
If you want to add in controller support, one straight forward way would be to map Mouse X and Mouse Y to Joystick 2 on a standard 2 joystick controller, however this would conflict with the “right click to change mouse view” feature we added. Adding in joystick specific features requires modification of the Input settings, which might require adjustments in future projects using this camera rig. It’s likely ideal to use the second approach, but we’ll use a #define again so that there isn’t a critical error when implementing in a new project.
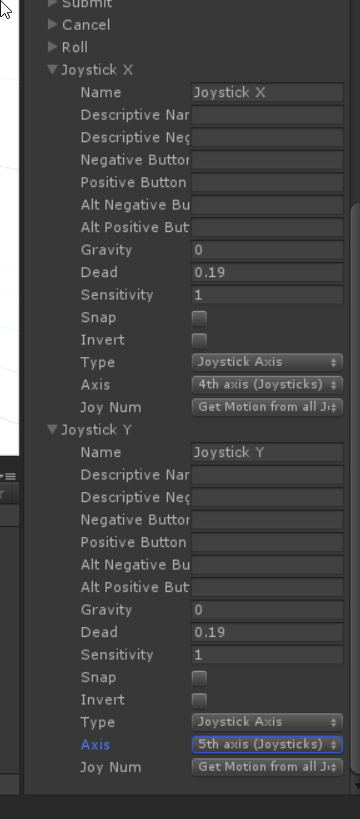
Open the Input settings, and add another 2 Axes. Name the first Joystick X and the second Joystick Y. You can use the second Horizontal and Vertical entries as models for Gravity, Dead, and Sensitivity settings. Set the Type to Joystick Axis. Set the Axis to 4th and 5th axis respectively. (this is a setting that varies by controller type, if not using an XBox One controller, try to look up a mapping online, or experiment if the axes don’t seem to be set correctly.)
Open up the CameraRig script, and add in a check on the Joystick X and Joystick Y axes. Set this under an else clause for the mouse button check, so that either joystick or mouse is used but not both.
#define ROLL_ENABLED // create a Roll axis in input or comment this out
#define JOYSTICKLOOK_ENABLED // create Joystick X and Joystick Y axes in input
                             // or comment this out
using System.Collections;
using System.Collections.Generic;
using UnityEngine;

public class CameraRig : MonoBehaviour {

	CharacterController cc = null;
	float speed = 20.0f;
	float lookspeed =80.0f;
	float rollspeed =40.0f;

	// Use this for initialization
	void Start () {
		cc = GetComponent<CharacterController> ();
	}

	// Update is called once per frame
	void Update () {
		float forward = Input.GetAxis ("Vertical");
		float strafe = Input.GetAxis ("Horizontal");
		float jump = Input.GetAxis ("Jump");
		float lookside = Input.GetAxis ("Mouse X");
		float lookup = -Input.GetAxis ("Mouse Y");
		float roll = -Input.GetAxis ("Roll");

		cc.Move (
			speed * Time.deltaTime * (
				forward * transform.forward
				+
				strafe * transform.right
				+
				jump * transform.up
			)
		);

		if (Input.GetMouseButton (1)) {
			Vector3 rotAxis = (lookside * transform.up + lookup * transform.right);
			float rotValue = rotAxis.magnitude;
			transform.Rotate (rotAxis.normalized, rotValue * lookspeed * Time.deltaTime, Space.World);
		} else {
			#if JOYSTICKLOOK_ENABLED
			lookside = Input.GetAxis("Joystick X");
			lookup = Input.GetAxis("Joystick Y");
			Vector3 rotAxis = (lookside * transform.up + lookup * transform.right);
			float rotValue = rotAxis.magnitude;
			transform.Rotate (rotAxis.normalized, rotValue * lookspeed * Time.deltaTime, Space.World);
			#endif
		}
		#if ROLL_ENABLED
		transform.Rotate (transform.forward, rollspeed * roll * Time.deltaTime, Space.World);
		#endif
	}
}
Finally, go back into the Input settings, and under the Roll options, lets add roll functionality to the left and right bumper buttons on the controller. This will complete our controller mapping, so that “X” and “Y” move us up and down, left and right bumpers roll, left joystick moves and strafes, and right joystick changes direction.
And there you have it, a fly-through-walls camera rig that will allow you to look at your visualizations from any perspective.
Click here for the final Unity project
PS An alternate version of the script that uses a configuration variable, set by checking for axis existence, rather than an ifdef, is available below.
using System.Collections;
using System.Collections.Generic;
using UnityEngine;

public class CameraRig : MonoBehaviour {

	CharacterController cc = null;
	float speed = 20.0f;
	float lookspeed =80.0f;
	float rollspeed =40.0f;
	bool useRoll = true;
	bool useJoystick = true;

	bool isAxisEnabled(string axisName) {
		try {
			Input.GetAxis(axisName);
			return true;
		}catch(UnityException e) {
			Debug.Log ("CameraRig.cs requires Roll axis to be set up in Input Manager to incorporate Roll feature.");
			Debug.Log ("CameraRig.cs requires Joystick X and Joystick Y axes to be set up in Input Manager to incorporate controller-based look.");
			return false;
		}
	}

	// Use this for initialization
	void Start () {
		cc = GetComponent<CharacterController> ();
		useRoll = isAxisEnabled ("Roll");
		useJoystick = isAxisEnabled ("Joystick X") && isAxisEnabled ("Joystick Y");
	}

	// Update is called once per frame
	void Update () {
		float forward = Input.GetAxis ("Vertical");
		float strafe = Input.GetAxis ("Horizontal");
		float jump = Input.GetAxis ("Jump");
		float lookside = Input.GetAxis ("Mouse X");
		float lookup = -Input.GetAxis ("Mouse Y");

		cc.Move (
			speed * Time.deltaTime * (
				forward * transform.forward
				+
				strafe * transform.right
				+
				jump * transform.up
			)
		);

		if (Input.GetMouseButton (1)) {
			Vector3 rotAxis = (lookside * transform.up + lookup * transform.right);
			float rotValue = rotAxis.magnitude;
			transform.Rotate (rotAxis.normalized, rotValue * lookspeed * Time.deltaTime, Space.World);
		} else if(useJoystick) {
			lookside = Input.GetAxis("Joystick X");
			lookup = Input.GetAxis("Joystick Y");
			Vector3 rotAxis = (lookside * transform.up + lookup * transform.right);
			float rotValue = rotAxis.magnitude;
			transform.Rotate (rotAxis.normalized, rotValue * lookspeed * Time.deltaTime, Space.World);
		}
		if (useRoll) {
			float roll = -Input.GetAxis ("Roll");
			transform.Rotate (transform.forward, rollspeed * roll * Time.deltaTime, Space.World);
		}
	}
}