Using the GetComponent Command
One of the most important features of Unity’s scripting language is the “GetComponent” command. Each game object in Unity has its features extended by components. Components can be used to attach a renderer, or a collider, or a special effect. Components can also be used to attach our custom scripts.
At times, you will want a script on an object to be able to access that object’s other components. Sometimes, you will want your script on one gameobject to be able to access public member variables and methods of a script attached to another game object. GetComponent is the plumbing that will allow that to happen.
This blog will introduce you to the GetComponent command by having our oscillator from the first blog not just oscillate around some equilibrium, but around some equilibrium bond distance to another object.
Additionally, we will show another feature of the Unity editor, which is the use of the Unity editor to set the values of public member variables in a scene, as well as the creation of prefab objects to make it easy to create many objects with the same customizations.
This blog post assumes you have worked through the previous post, or that you know how to add a gameobject to a unity scene and attach a script to the object. We will not, however, start from where the last blog left off but rather start from a new unity game.
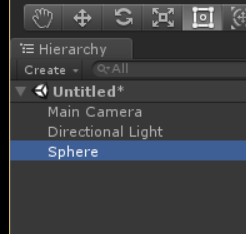
To begin, open unity and create a new 3D game.
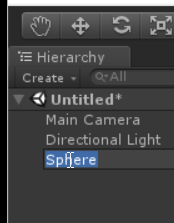
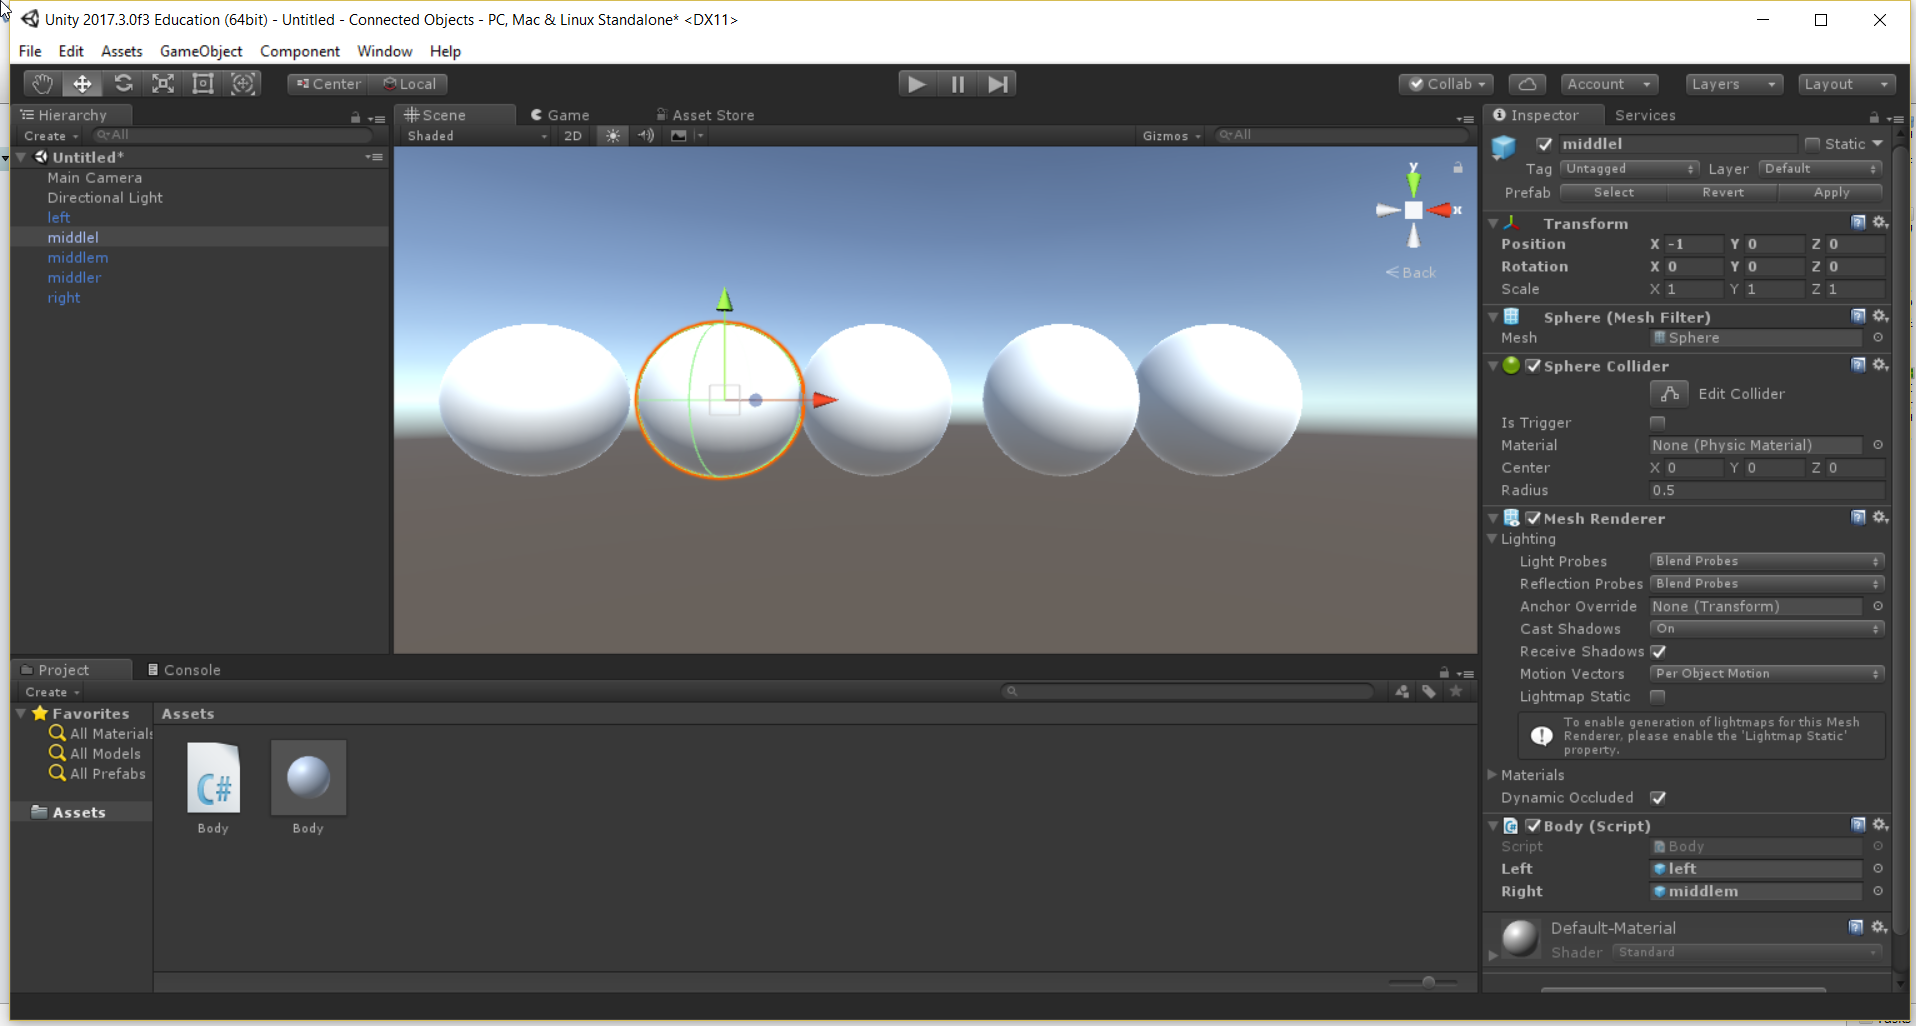
Create a sphere in the hierarchy. Save your scene. Often.
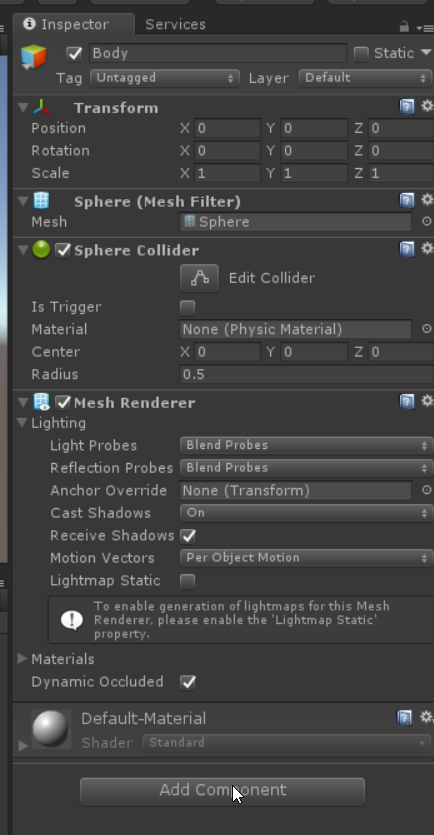
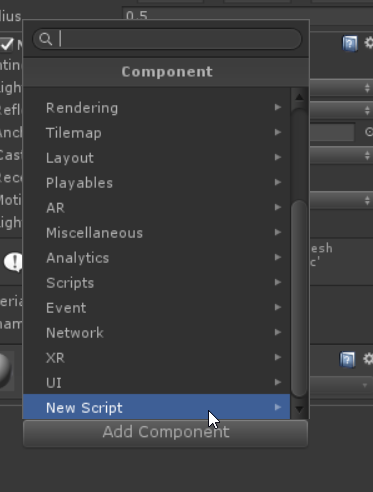
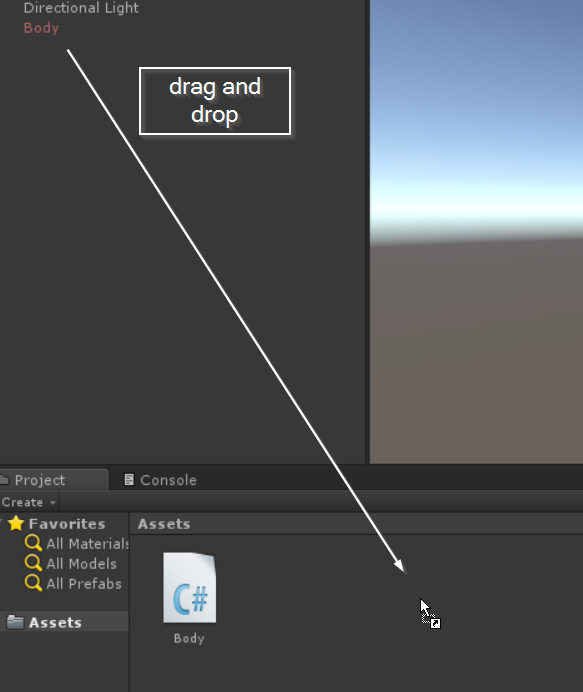
Add a component to the sphere of a new script. Name the script something that makes sense to you. This will be something that we will make a prefab out of, and what I like to do is to have the prefab and the script have the same name. I’m going to rename my sphere in the hierarchy window “Body”, and add a script called Body to it. If my prefab, its script, its materials, etc. all have the same name its easier to see what goes together.

Once that is done, drag Body from the hierarchy panel to the project panel. This is the easiest way to create a prefab. Creating an object as a prefab has many advantages, especially if the object will be reused in many scenes, many programs, or if there will be multiple copies of the object in the same scene. The object in the hierarchy is now linked to this prefab, and changes in the prefab that haven’t been overridden in the hierarchy will automatically updated across all instances of the prefab in the scene.
What we are going to do initially is create a string of Body objects, all in a row. Each of these objects will have a link to objects on the right and left, which we will set in the editor. Our leftmost and rightmost object will be fixed in place, and all of them will be modeled to move as if connected in line by a series of springs. Each object will move as an oscillator, as in the last blog, but the spring forces will be determined by a relaxed length of each spring and by the position of the objects to the left and right.
This will allow us to see one method of creating a model in unity, where each instance of an object has its own rules for recognizing its surroundings and interacting with them. This approach has strengths and weaknesses. On the plus side, it’s easy to think of objects as “objects” in the computer science sense using this approach, and to think of the rules that individual objects follow. However, it may not be as efficient as keeping a separate numerical model that we simply attach objects to for the purposes of visualization. This can be a good way to get started, and you can rethink how you structure your models when you find that efficiency has become more important.
Double click your Body script (or whatever you chose to call it) to open it. To begin with, let’s have each object store a variable for other objects to the left and right. We will make these variables public, so that they are visible to the editor and we can set them in the editor. We will make these variables of type GameObject as we are going to store the actual game object in unity attached to the left or right. Set the initial value to null so that we can have a default case be no objects attached, useful for knowing which objects are at the end.
using System.Collections;
using System.Collections.Generic;
using UnityEngine;

public class Body : MonoBehaviour {

	public GameObject left = null;
	public GameObject right = null;

	// Use this for initialization
	void Start () {

	}

	// Update is called once per frame
	void Update () {

	}
}
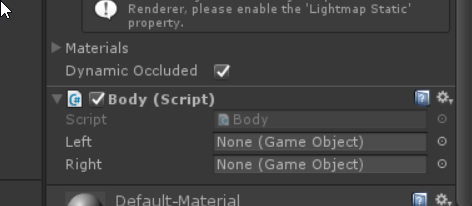
Save your script and go back to the Unity editor. GIve it a few seconds to refresh, and highlight the Body object in your hierarchy panel. Check to see that the “Body (Script)” component now has two fields for Left and Right. If it doesn’t, check your console panel to see if there are any syntax errors in your script.
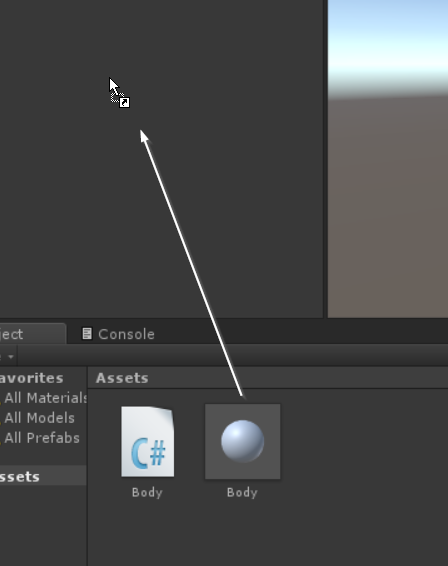
Drag two more prefab “Body” objects onto the hierarchy panel from the Project panel.
Switch your main view to the scene panel if it is not there already. Move two of the Body objects along the x-axis. You can do this either by selecting the object in the hierarchy, and changing the transform position in the inspector, or you can select the move tool in the upper left corner of the editor window and drag it into place.

Move your objects so that they are at positions of roughly -2, 0, and 2 along the x axis, and 0 in y and z. I will rename my scene objects to make it a little easier to keep them apart as left (at -2), middle, and right. Highlighting left in the hierarchy panel to open it in the inspector, drag middle from the hierarchy panel into the spot marked “right” for the “left” object now showing in the inspector (the middle object is to the right of the leftmost object).
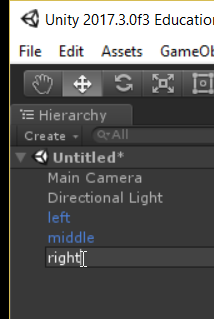

Repeat this for middle (left is to the left, right is to the right), and for right (middle is to the left).
Now it is possible for each object to know which other objects they are connected to, and to get information about those other objects.
Open up the Body script again, and lets add a default “spring length” l which we will set equal to 2, a mass m=1, a initial velocity=0, and a stiffness k=1. Unity tends to work in float by default, which isn’t great from a precision point of view but will be good enough for this example, so for now we will stick with floats for our real numbers.
using System.Collections;
using System.Collections.Generic;
using UnityEngine;

public class Body : MonoBehaviour {

	public GameObject left = null;
	public GameObject right = null;

	float k=1;
	float m=1;
	float l=2;
	float v=0;

	// Use this for initialization
	void Start () {

	}

	// Update is called once per frame
	void Update () {

	}
}
In Update, we want to check to see if there are objects to the left and right, and if so, calculate a spring force from each of those, and use it to update our position and velocity. The current objects position can be taken from its transform.
using System.Collections;
using System.Collections.Generic;
using UnityEngine;

public class Body : MonoBehaviour {

	public GameObject left = null;
	public GameObject right = null;

	float k=1;
	float m=1;
	float l=2;
	float v=0;

	// Use this for initialization
	void Start () {

	}

	// Update is called once per frame
	void Update () {
		if (left != null && right != null) {
			float my_x = transform.position.x;
		}

	}
}
What about the objects to the left and right? We can use GetComponent to get access to the instance of the Body script attached to the other objects, and read the transform variables of those objects. GetComponent is a templated command, and we specify the class to which it is applied in angled brackets in between the function name and argument list. I called my script “Body” so the data type I want to get with GetComponent is “Body”.
using System.Collections;
using System.Collections.Generic;
using UnityEngine;

public class Body : MonoBehaviour {

	public GameObject left = null;
	public GameObject right = null;

	float k=1;
	float m=1;
	float l=2;
	float v=0;

	// Use this for initialization
	void Start () {

	}

	// Update is called once per frame
	void Update () {
		if (left != null && right != null) {
			float my_x = transform.position.x;
			float left_x = left.GetComponent<Body> ().transform.position.x;
			float right_x = right.GetComponent<Body> ().transform.position.x;
		}

	}
}
The math at this point is straight forward. The ideal spring position for the left spring is $x_{left}+l$ so the spring force is $F_{left} = -(k) (x-(x_{left}+l))$. Similarly, $F_{right} = -(k) (x - (x_{right}-l))$. We will use a leapfrog method to first update the velocity, and then update the position.
using System.Collections;
using System.Collections.Generic;
using UnityEngine;

public class Body : MonoBehaviour {

	public GameObject left = null;
	public GameObject right = null;

	float k=1;
	float m=1;
	float l=2;
	float v=0;

	// Use this for initialization
	void Start () {

	}

	// Update is called once per frame
	void Update () {
		if (left != null && right != null) {
			float my_x = transform.position.x;
			float left_x = left.GetComponent<Body> ().transform.position.x;
			float right_x = right.GetComponent<Body> ().transform.position.x;
			float force_left = -k * (my_x - (left_x + l));
			float force_right = -k * (my_x - (right_x - l));

			// a = F/m
			v += (force_left + force_right) / m * Time.deltaTime;

			// can't change transform.position.x directly in Unity so
			//    do this in steps.
			Vector3 newPosition = Vector3.zero;
			newPosition.x = transform.position.x + v * Time.deltaTime;
			transform.position = newPosition;

		}

	}
}
Play this in the editor, you should see a tiny oscillation of the middle object.
Change the initial x value of middle by moving it in the scene in the editor and re-run the model. You should see a larger oscillation.
If this is working, we can expand our chain by simply adding in more “Body” prefabs, setting their position, and attaching them in the editor. Try chaining together 5 objects all roughly 1 apart.
There are other things we can try here, such as changing the size of the object in the prefab. Change the x, y, and z scale values in the Body prefab to 0.5. Notice that all of the objects are smaller in the screen. Select a single object in the scene, and reset its scale to 1,1,1. After doing this, change the prefab scale to 0.3,0.3,0.3. Notice that an object that has had a prefab value set in the scene directly overrides the prefab value, but that if no overridden value has been set, the prefab can be used to change things globally.
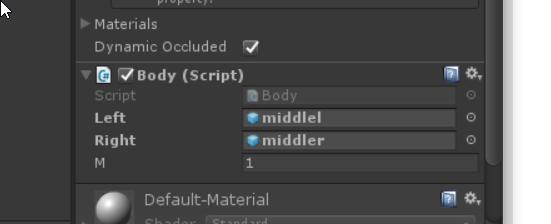
Also, we could change the mass of each individual object. Change the definition of mass in the Body script to be public.
using System.Collections;
using System.Collections.Generic;
using UnityEngine;

public class Body : MonoBehaviour {

	public GameObject left = null;
	public GameObject right = null;

	float k=1;
	public float m=1;
	float l=2;
	float v=0;

	// Use this for initialization
	void Start () {

	}

	// Update is called once per frame
	void Update () {
		if (left != null && right != null) {
			float my_x = transform.position.x;
			float left_x = left.GetComponent<Body> ().transform.position.x;
			float right_x = right.GetComponent<Body> ().transform.position.x;
			float force_left = -k * (my_x - (left_x + l));
			float force_right = -k * (my_x - (right_x - l));

			// a = F/m
			v += (force_left + force_right) / m * Time.deltaTime;

			// can't change transform.position.x directly in Unity so
			//    do this in steps.
			Vector3 newPosition = Vector3.zero;
			newPosition.x = transform.position.x + v * Time.deltaTime;
			transform.position = newPosition;

		}

	}
}
Save your script, and go back to the unity editor. Select the middlemost object in the scene, and look at it in the inspector. Notice that you can now modify m for that object in the editor. This value will override whatever is in the script. Set the middlemost mass to something very large, or very small. Play the model. Do you notice the change in behavior?
So, at this point we’ve made a multi-object model, with each object having it’s rules determined by a script, with nearby objects explicitly linked as public GameObject variables, and have updated the positions of the object by calling GetComponent on the Body script on the other object. Future posts will look at model efficiency and precision, and methods of separating calculation from visualization.
Let’s add one final touch to our current model to get another example of using GetComponent. We used it so far to get at another objects transform, but lets use it again to change each objects color based on how fast it is moving.
using System.Collections;
using System.Collections.Generic;
using UnityEngine;

public class Body : MonoBehaviour {

	public GameObject left = null;
	public GameObject right = null;

	float k=1;
	public float m=1;
	float l=2;
	float v=0;

	// Use this for initialization
	void Start () {

	}

	// Update is called once per frame
	void Update () {
		if (left != null && right != null) {
			float my_x = transform.position.x;
			float left_x = left.GetComponent<Body> ().transform.position.x;
			float right_x = right.GetComponent<Body> ().transform.position.x;
			float force_left = -k * (my_x - (left_x + l));
			float force_right = -k * (my_x - (right_x - l));

			// a = F/m
			v += (force_left + force_right) / m * Time.deltaTime;

			// can't change transform.position.x directly in Unity so
			//    do this in steps.
			Vector3 newPosition = Vector3.zero;
			newPosition.x = transform.position.x + v * Time.deltaTime;
			transform.position = newPosition;

			if (v < 0) {
				GetComponent<Renderer> ().material.color = Color.Lerp (Color.green, Color.red, -v+0.5f);
			} else {
				GetComponent<Renderer> ().material.color = Color.Lerp (Color.green, Color.blue, v+0.5f);
			}
		}

	}
}
Here we are setting the color of the material of the renderer component attached to the gameobject, with some conditional logic so that for negative velocities the color will be reddish and for positive velocities the color will be blueish, with slightly more intense colors for higher speeds.